Building stairs is one of the most challenging - and rewarding - jobs involved in building a log cabin. There’s a bit of art included in building stairs where it’s necessary to balance utility, safety and aesthetics.
Many people don’t realize the various dimensions and trade-offs required to safely incorporate the building code guidelines.
Jump to:
Summary of International Residential Code (IRC) for Building Stairs
International Residential Code (IRC) establishes minimum requirements for building stairs for safety. These are some of the items your building inspector will check for when they do their inspections.
The following list summarizes the basic code requirements for residential stairs and their dimensions:
- Minimum 36” clear width for stairway. Three feet is the minimum, 3-½’ feels much more spacious.
- Maximum 4-½” handrail projection into stairway width, on either side. Take this width into account when planning overall space for the log stairs.
- Minimum 6′-8″ headroom height clearance - the distance from the nose of the tread to any overhead member, but an extra 6” makes a big difference in feel. If you can’t adjust the riser/tread ratio adequately, you may need to frame a larger stair opening.
- Maximum 12′-3″ vertical height (rise) for a flight of stairs. Otherwise you’ll need to add a landing.
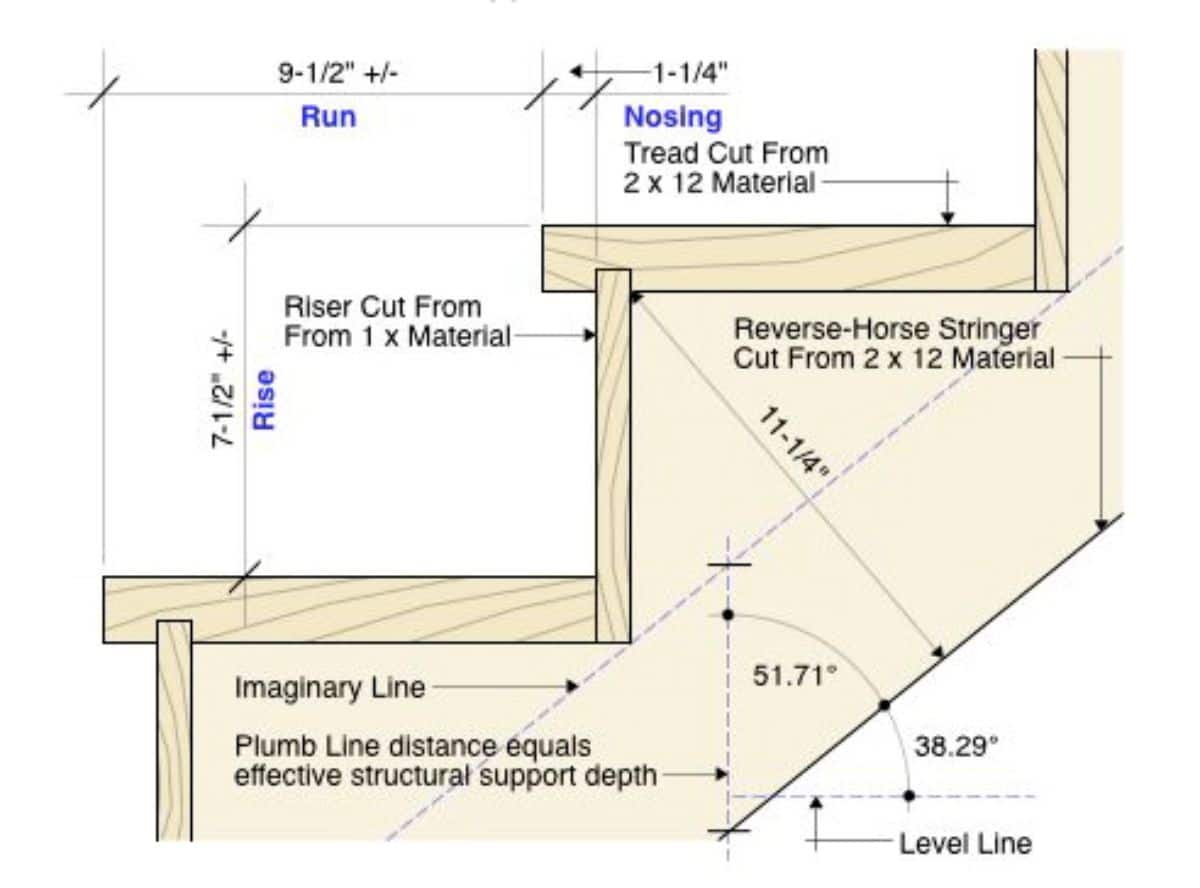
- Maximum 7-¾” stair riser height. Dimensions exclude rugs or runners.
- Minimum 10” stair tread depth with nosing or minimum 11” with no nosing. Nosing is between ¾” and 1-¼”. See below for various combinations of riser and tread.
- Handrail graspability to be either Type I or II with a minimum 1-½” clearance from a wall.
- The open side of any stairway higher than 30" must have a railing fixed at 30" to 34" above the tread nosing; Closed stairways require a handrail on one side (or both, if the steps are wider than 44").
- Maximum tread depth variability and maximum rise variability = 3/8". This avoids potential trip hazards when people expect a consistent rise and tread spacing.
- Maximum slope of riser = between the 34° to 37° angle. This gives a good “feel” to the log stairs.
Tips for Building Stairs
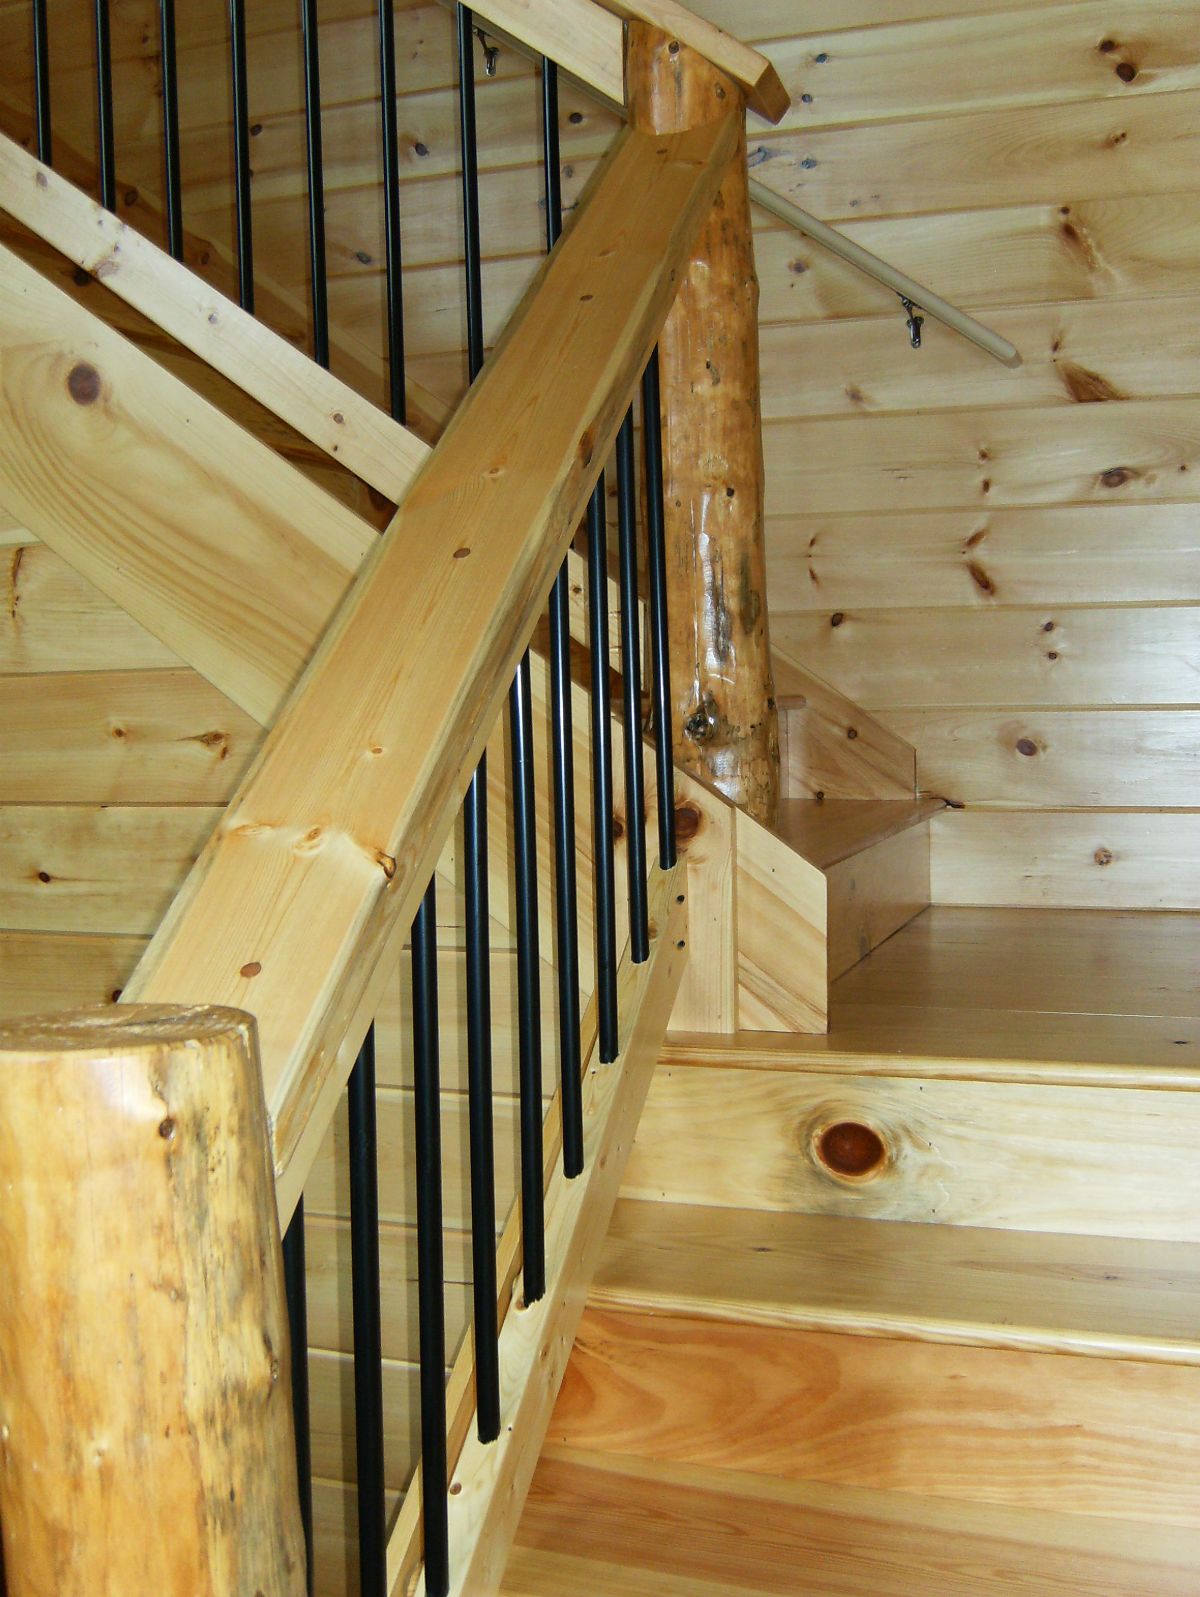
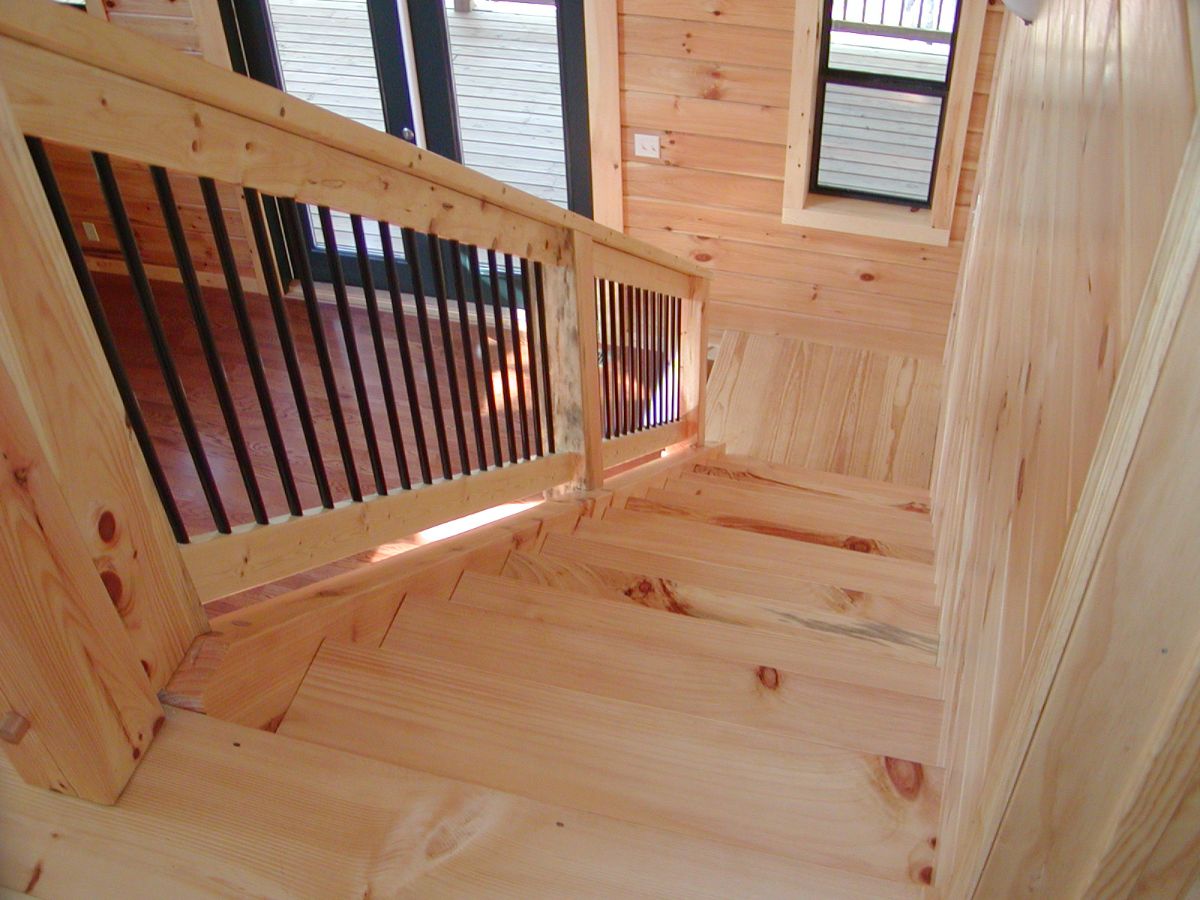
The basic design for building stairs uses a cutout or notched, stringer. The flat seats where the treads lay are cut into the 2” × 12” stringers, creating a sawtooth pattern in the upper edge. The stringers can remain open or be closed on the sides with skirt boards.
Carriage stringers are nearly always made from 2 × 12s, since their depth allows for the minimum 3 1/2" of wood between the plank's lower edge and the cuts. Stairs with two-by or thicker treads—deck steps or rustic interior designs like log stairs—have stringers spaced 3' apart. This is typical with log stairs although you can always add another center stringer for additional support.
People tend to develop certain expectations, such as that a flight of stairs will feel "right" underfoot. Building codes set guidelines, and within those limits, there's enough flexibility to work up a stairway that's comfortable - in both step and angle - and which will fit in any reasonable space between floor levels in your log home.
Rules of Thumb for Building Stairs
There are certain Rules of Thumb that have evolved over time to help guide us as we design and build stairs.
- The sum of all unit runs (tread less nosing) = TOTAL RUN
- The sum of all unit risers = TOTAL RISE (measured from FINISHED floor to FINISHED floor).
- Rise + Tread Width = 17” to 18” - also known as the 7-11 rule, where a 7” riser and 11” tread (not including nosing) is ideal.
- Rise times tread width = 72” to 76”.
- The sum of two risers plus tread width = 24” to 25”.
Stair Tread Calculation
Total Rise
First you must decide on what you’re using for finished cabin flooring surfaces for both upper and lower floors. Maybe you want to use full 1-½” hardwood flooring over the subfloor downstairs and ½” tile upstairs. Factor this into your measurements.
Once you’ve established the height between finished surfaces, grab a calculator and we’ll plug in some numbers to play with.
Let’s say your ceiling height is 8’ and your working height or total rise is 104.25” (subfloor to ceiling = 8’ + 9-¼” floor joists + ½” upper flooring - 1-½” lower flooring). Start off by dividing this number by 15, which is a typical number of risers for houses.
104.25” / 15 = 6.95”
This gives a result of 6.95" or about 6-15/16” for each riser height, which is a bit low. Reduce the number of risers by one and using 14 risers we now have a riser height of 7.4” or 7-⅜”.
104.25” / 14 = 7.4”
Using the next rule, subtract this from 17.5” to get the tread width. This results in 10.1” or 10-⅛” for tread width.
17.5” - 7.4” = 10.1”
Total Run
The total run is the horizontal distance taken up by the stairs (NOT the diagonal measurement) from bottom riser to top, where the header forms the last riser.
Bearing in mind that the floor surfaces serve as treads, subtract one tread from the original calculation: 14 treads becomes 13 treads.
Multiply the number of treads (13) by the width of each tread (10.1”) to get 131.3” or just over 10’ 11-¼”.
13 x 10.1" = 131.3"
Now you can determine if your log stairs plan will fit into the space available in the overall log cabin home design.
If not, here’s where the art of stairs comes in. Try adjusting the size of the treads and or the risers, removing one of the risers, etc., until you can get it to fit while still remaining within the earlier parameters.
You can alternatively adjust the width of each tread slightly, say by ⅛” or ¼” until you get the required overall horizontal distance.
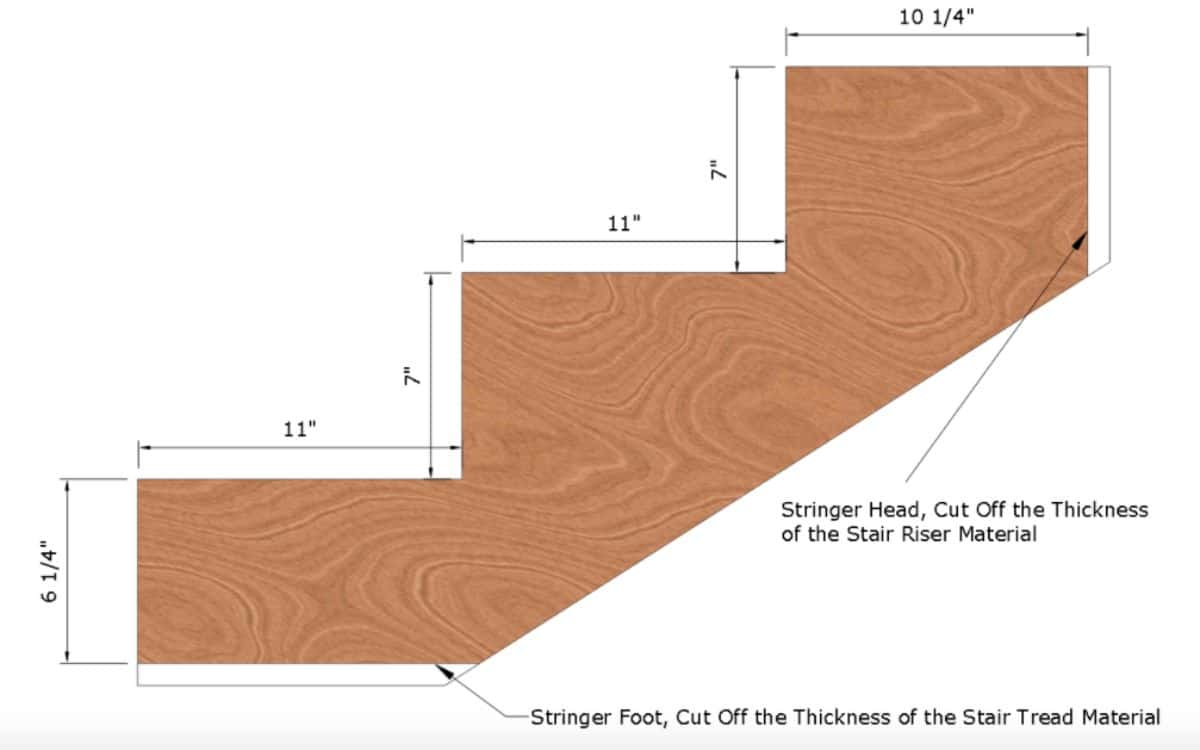
Measuring and Cutting Stringers
To get the length of the stringers you simply use basic geometry:
A² + B² = C²
But remember to add in the width of the “missing” floor tread so you can mark the layout accurately.
Stringer length = square root of (131.3² + 104.25²) = 167.65” or 13’ 11-⅝”.
Adding in the “missing” tread gives 177.75” or 14’ 9-¾”. If you order 16-foot 2” x 12”s you will have plenty of room for layout, trimming and avoiding knots.
Cutting the Stair Stringers
Once you have your stair pattern laid out on the 2” x 12” stringers with a framing square, you can cut it using a circular saw (cutting up to the marks) and then finishing the cuts with a handsaw.
Bear in mind you will need to “drop the stringer”, which means cutting off the bottom of the stringer by the thickness of one tread so that all of the riser heights will be the same (if the stringer is sitting on the finished floor - if not, cut off the stringer by the difference between the thickness of one tread and the thickness of the finished flooring material).
The idea is that as you step up from the finished floor onto the tread on the first step the total rise should be the same as stepping from tread to tread.
You will also need to cut off the top of each stringer vertically by the thickness of your riser material. Again, this is to ensure that each tread depth is exactly the same so the header acts as the first riser.
Attaching the Stringers, Risers and Treads
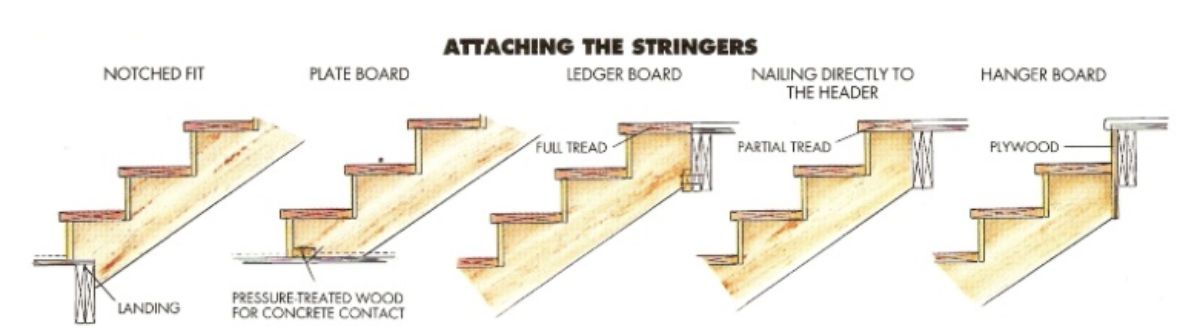
At the top of the stringer there are a couple of options for attaching the carriage when you're building stairs. If the top tread meets the finished floor you can nail the stringer right to the header, or notch the lower corner and install a ledger board to support the stringers from below.
An even simpler solution is to let the header be the first riser. In this case the stringer is attached to a hanger board which is nailed to the header.
The base of the stringers can be nailed directly to the subfloor or notched to fit against a landing board, such as a pressure-treated 2x4 nailed on the slab.
Cut each tread and riser to fit and nail them into place using 8d finish nails for standard treads, working your way up the stairs. If you’re using hardwood treads you should pre drill the holes to avoid splitting.
If you’re installing log treads you will need to use fasteners appropriate for their size. Sometimes we’ll attach a heavy log tread from the backside using log screws when we're building stairs.
Or we will use log screws from the side of the tread and countersink wooden dowels to hide the holes, turning this into an interesting feature.
Building stairs is a challenging task but with these basic skills understood you can take on the project for your log home. Log stairs are the next step once you’ve mastered basic stairs.
Leave a Reply