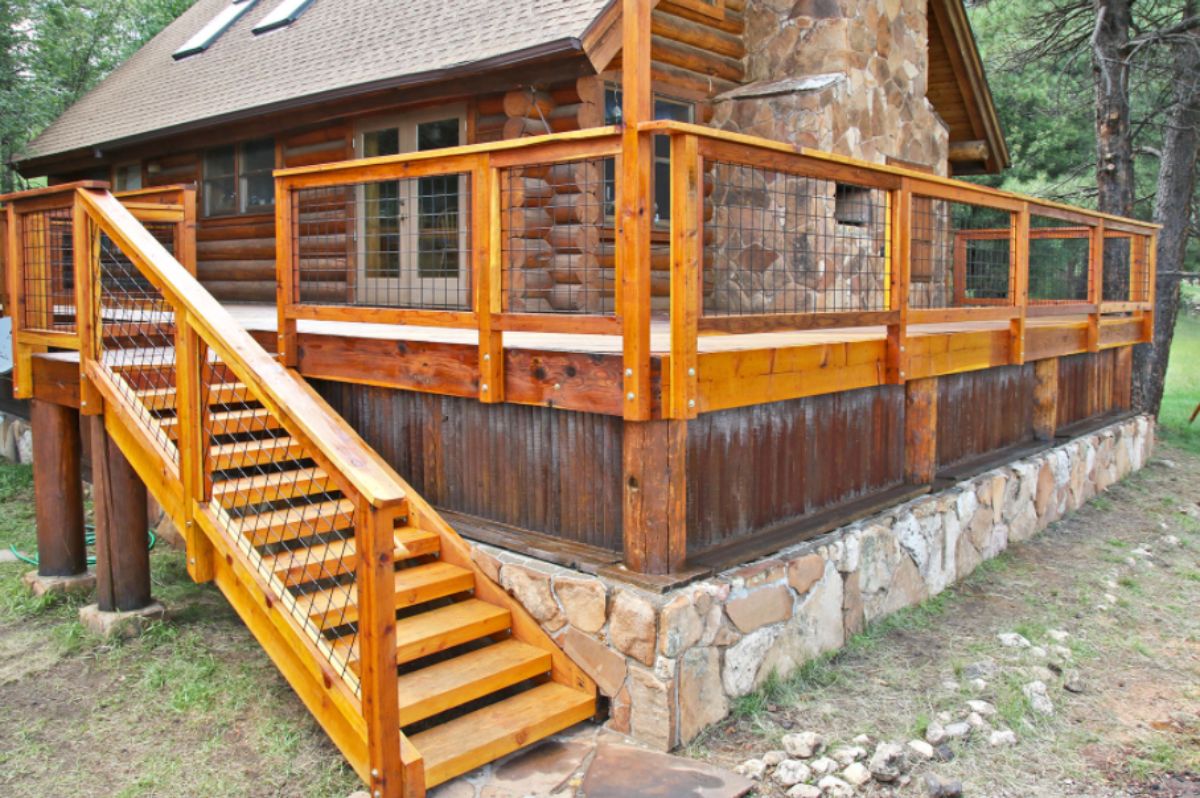
Installing ledger boards on log homes is not as straightforward as installing ledgers on stick-built or framed houses. Ledger boards are required to tie in an additional structure - such as a porch or deck or shed roof - to the existing log home or cabin. On a standard framed house you can attach the ledger to the rim joist or lag screw it into the studs. On a log home we have to deal with trying to attach a flat board to round logs.
Jump to:
Mounting the Ledger Board
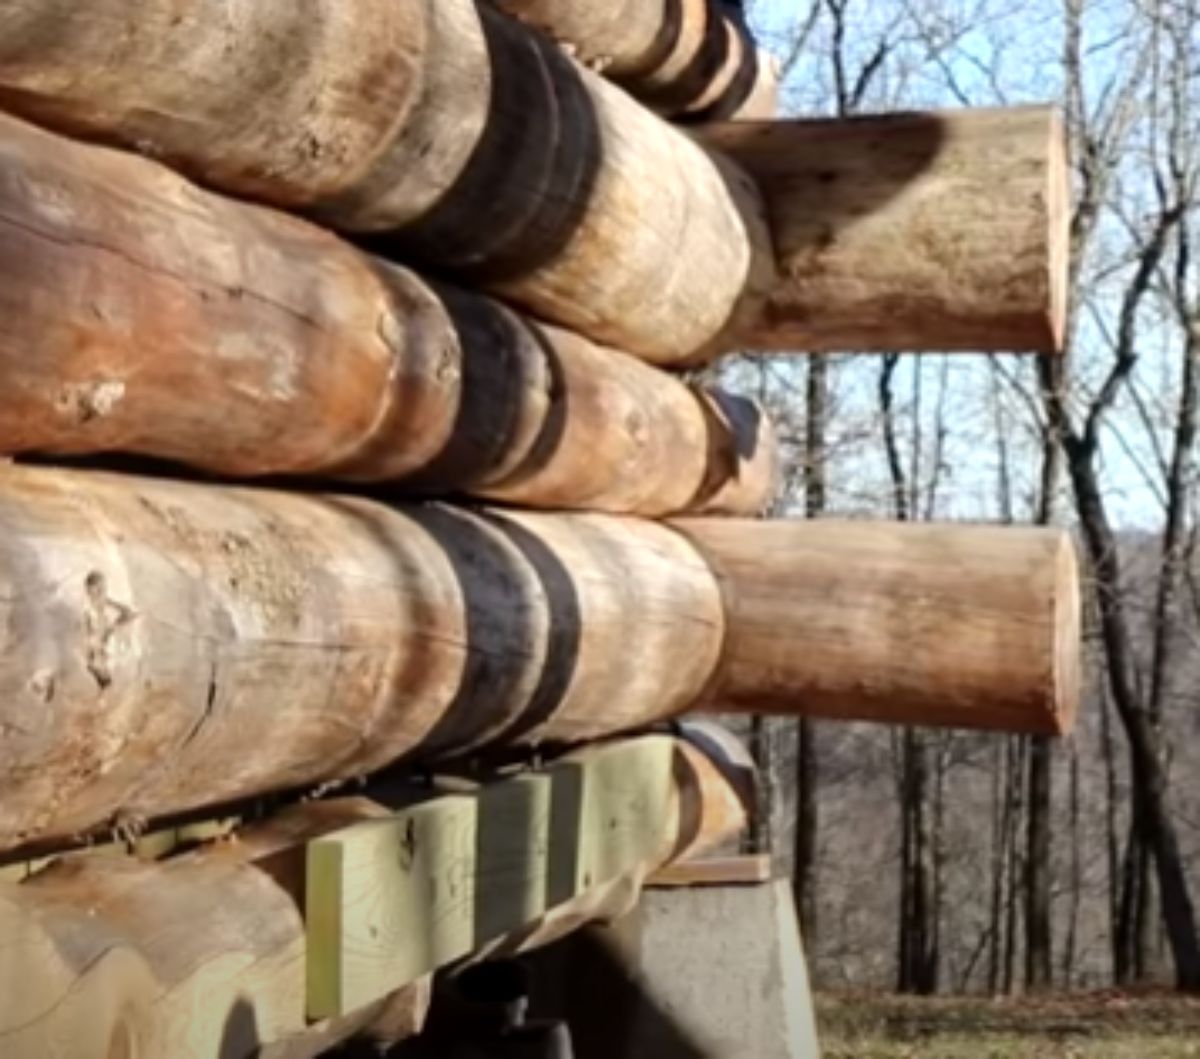
How do you mount a flat board on a round log? The trick is to view the log wall surface as a plane and choose your mounting position carefully such that your finished ledger board will be plumb and level. The easiest way is to attach the ledger board where it will span across two logs, hitting each one at the same point so that the ledger remains flush and plumb against the logs.
- Powerful 7.5 AMP motor for improved performance
- Two-blade cutter head with 16,000 RPM delivers smooth finish and fast stock removal
- Lock-on button for continuous operation
- V-groove on front shoe for easy chamfer cutting
- Precision machined aluminum base for planing accuracy
Another option is to mill a flat face on the round log where you want to attach the ledger board. The best way to accomplish this is with a power planer (I like the Makita 4-3/8" Power Planer). Just by hitting the high points on the log you can establish a flat surface so that the ledger board can sit on and fit tight against the wall. Be sure that you have maintained a consistent flat plane along the entire wall.
Attaching the Ledger Board
- Dimensions: Head Height/Width .469 - Diameter .24" - Length 2" - Use 5/16" Hex Head Bit
- These screws are a far superior alternative to spikes for greater holding power.
- Manufactured from high quality heat treated steel and are ACQ treated lumber compatible
- The black log screw coating passed the 1000 hour salt spray tests without failure
- Black Log Timber/Landscaping Screws Have Drag Reducing Knurled Shoulders for Easier Installation
The best way to attach the ledger board is using log screws. These are structural screws and have a high shear strength. They are easy to use, being self-tapping and will snug the boards tight into the log wall. You can choose a length equal to the thickness of your logs so that you maintain at least 1-½” space without the screws coming through on the inside. In other words, if you’re building with 10” diameter logs, use a 10” log screw. Once you’ve gone through the 1-½” ledger board the log screw will penetrate the logs by 8-½” giving a strong bond.
Alternatively, you can use galvanized or stainless lag screws long enough to penetrate deeply in the logs. If you are attaching your ledger to a rim joist and have access to the space behind the joist, your best option is using galvanized bolts with wide washers backing up the nut and the bolt head.
When using PT or pressure-treated lumber you can experience some warping as the lumber dries, so it’s a good idea to add screws along the top and bottom of the PT lumber to keep it flat. Be sure to use screws compatible with PT lumber such as hot-dipped zinc-coated galvanized steel, stainless steel, silicon bronze, or copper.
- ENGINEERED FOR THE OUTDOORS: Ideal for decking and any outdoor wood project
- BEST-IN-CLASS CORROSION PROTECTION: Bronze epozy coating offers superior rust and corrosion protection
- SELF-STARTING TIP: Offers 20 percent faster engagement into wood; no splitting
- UNIQUE STAR DRIVE TECHNOLOGY: T25 Drive size virtually eliminates camout for a smooth effortless drive every time
- 5lb Tub contains approximately 417 pieces; this assortment is sold by weight and actual piece count may vary
Remember that second-story log homes are normally framed conventionally and covered with log siding, so you won’t be going into a log when attaching an upper deck or shed roof - you’ll need to hit a stud in the framing.
Flashing the Ledger Board
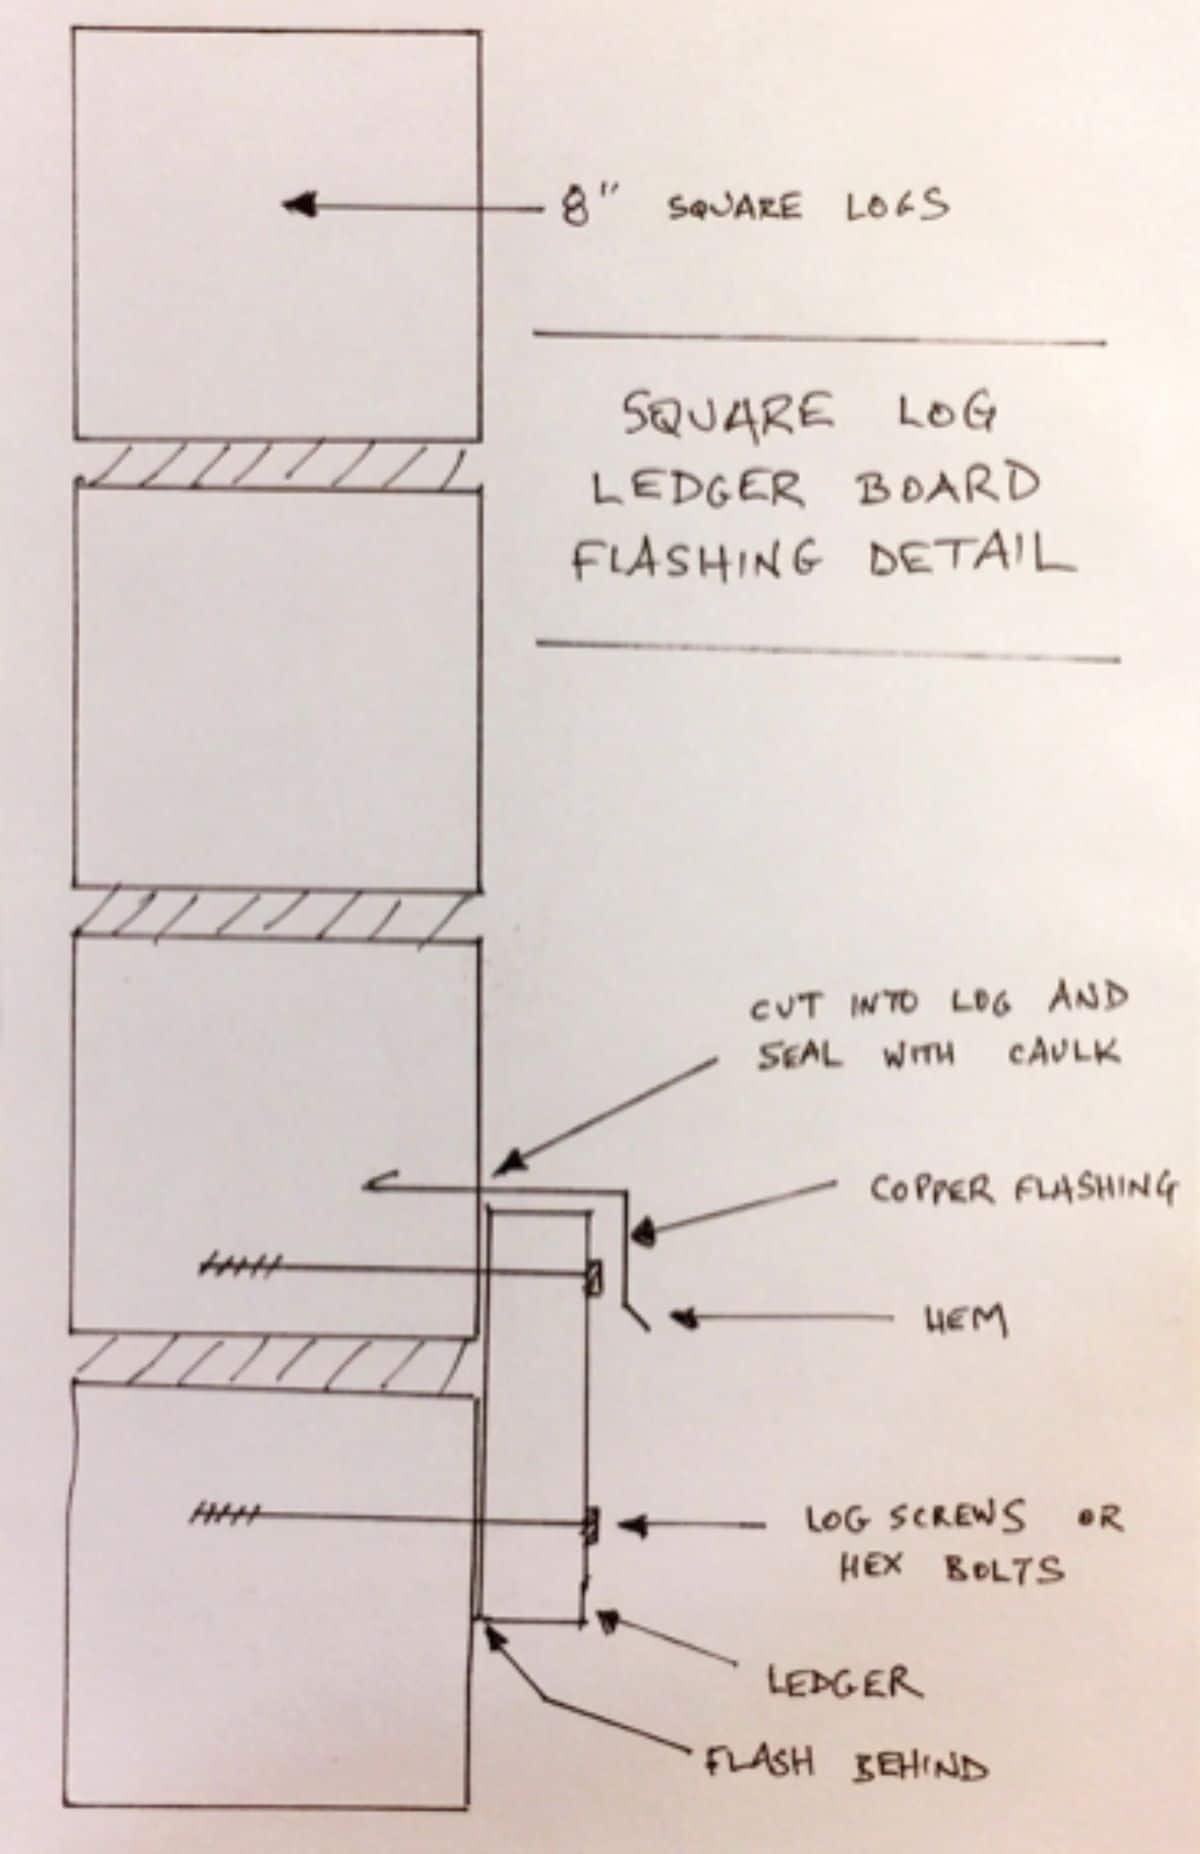
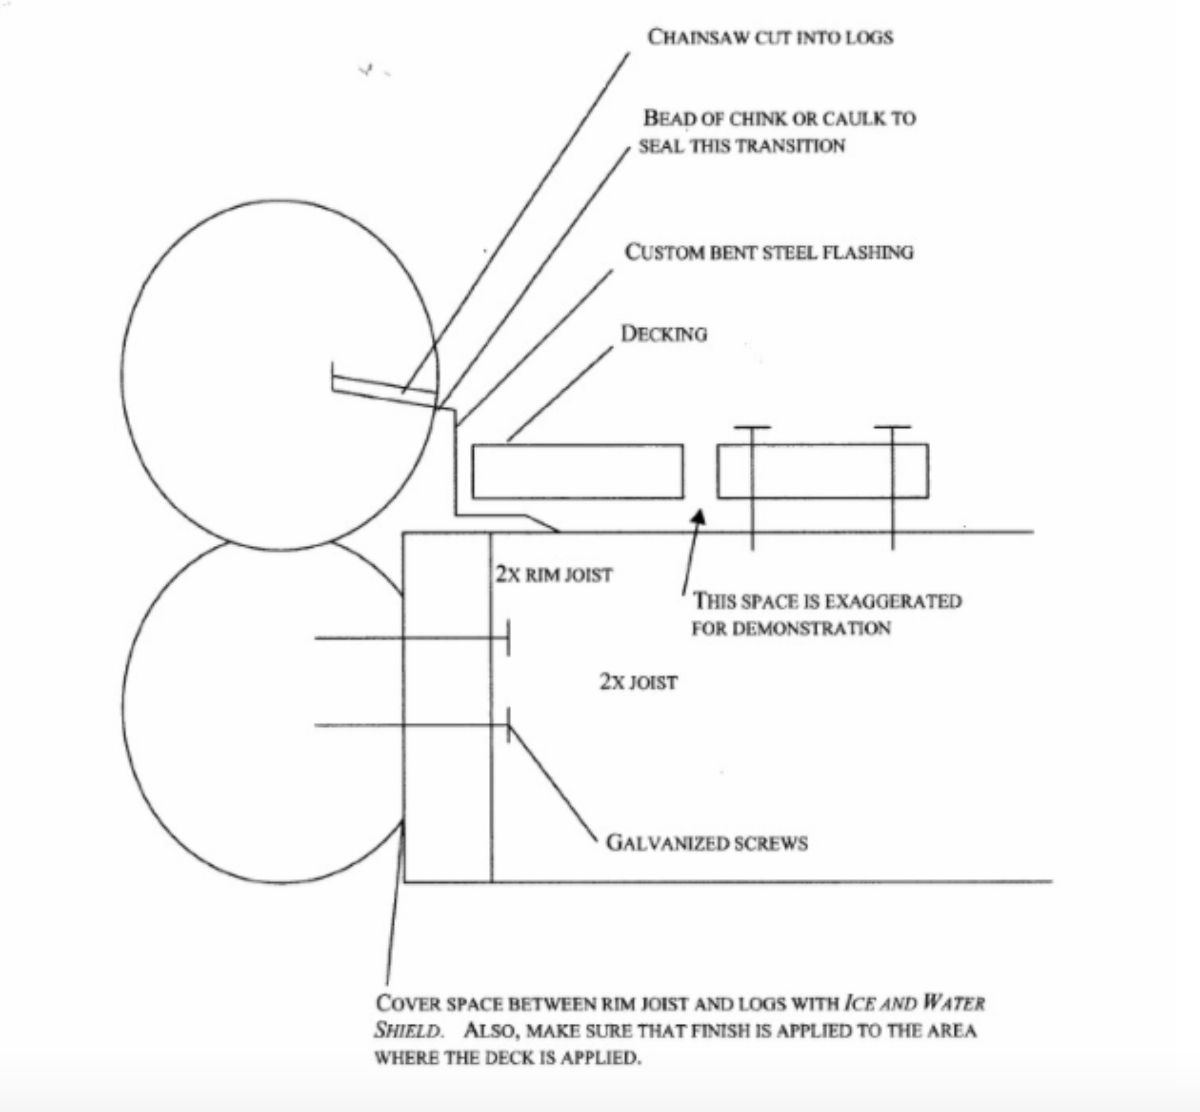
To flash a ledger board on a full-round log home we will normally cut a slot into the logs using the kerf of a circular saw and slip the flashing into the slot, bedding it in silicone caulk. Make sure you have a good angle to the flashing so the water runs off and down the roof instead of back against the log wall.
If your add-on roof is fairly flat, you can always angle up the flashing to increase run-off by cutting the slot an inch or two above the line where the roof intersects with the log wall.
Flashing comes in many different shapes but in this case, you can use straight flashing. If you’re installing a metal roof, which is often recommended for cabin roofing, they will supply the flashing to match the metal roof color. Another good option is to use copper flashing. It works easily and weathers to a beautiful, natural patina without the need for paint.
Bear in mind that aluminum is not compatible with PT (pressure treated) wood and galvanized metal won’t last long at ground level. Here is the place where copper works best.
Spacers
If it’s not possible to flash behind the ledger board and integrate it into the building envelope, a better alternative would be to mount the ledger board on spacers to allow rain and moisture to pass behind the board.
In other words, you can make the deck free-standing by using galvanized or stainless lag bolts with washers stacked between the ledger board and the building to create a stand-off that is securely tied to the rim joist.
Decks and Porches
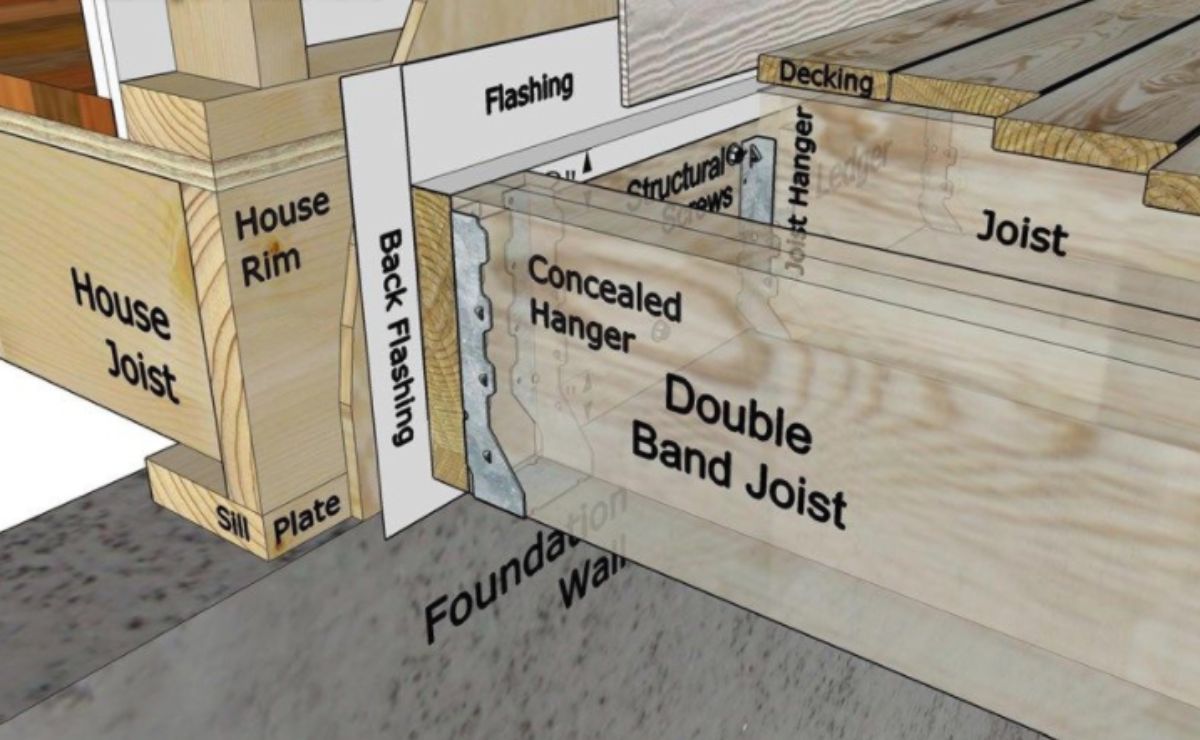
If you are attaching your ledger to the rim joist, cut an angled piece of flashing that can slip up behind the log siding (if used), or get caulked to the bottom of the bottom log. Nail this into the log and rim joist and butt the ledger board tight to the bottom of the flashing. Bend the flashing down over the ledger.
If all else fails, you will have to build the deck or porch as a freestanding structure, with posts or pilings along the side of the log home as well as along the outer edge. This will allow the water to pass behind the deck or porch and not penetrate the building envelope.
Remember that adding on a deck to a log home will create a splashback zone where the water dripping off the roof can splash onto the lower logs and cause them to rot. Be sure to include a plan for handling the water, such as installing gutters or using an extended roof to carry the rain away when incorporating a deck into your log cabin home design.
Adding on structures such as a deck, porch, or shed roof to a log home can be tricky. It’s important to consider the path that water will take and make sure that your logs are protected from moisture and rot.



Leave a Reply